** NOTE: To ensure reliable connectivity, you must be running iOS 10.x or later on your iPad. Please contact the ITS Help Desk if you need assistance upgrading to the latest version of iOS.
Boyden Library
Center for Service and Global Citizenship
HDMI connection only
- On TekSwamp remote, press On button to turn on projector
- Plug HDMI adapter cable on the shelf into the laptop.
- Press HDMI 1 on the Hitachi switcher (white box on bookshelf) and image will shortly appear on screen.
- Volume is controlled via Spkr Up/Down buttons on switcher as well as application playing audio.
- When you are done:
- Disconnect HDMI adapter cable from laptop.
- Turn off projector by pressing Off button on TekSwamp remote. When shut down prompt appears on screen, press Off once more.
Note on Video (this only needs to be done once):
To improve video appearance on laptop after connecting HDMI cable:
- Click on AirPlay icon in top menu
- Under Match Desktop Size to… select Built-in Display
Note on Audio (this only needs to be done once):
To play audio through room speakers:
- Click on Apple menu and select System Preferences
- Click on Sound (second row, last item)
- Click on Output and select Switcher
- Close window
Wireless projection available through Apple TV in classroom.
If projecting an iPad, please go to Apple TV.
If projecting a MacBook, it must be running Mac OS X 10.12.x (Sierra) or higher.
- MacBook Air must be connected GreenDoor
- On TekSwamp remote, press On button to turn on projector
- Press HDMI 2 on switcher and when Apple TV screen appears, move to next steps.
- Click on AirPlay icon in menu bar at top of screen (looks like a rectangle with a solid black triangle sticking into bottom).
- Select Apple TV being used (all Apple TV’s are named by room)
- Desktop image should now be projected
- Volume is controlled via Spkr Up/Down buttons on switcher as well as application playing audio.
- When done, be sure to disconnect from Apple TV so next user can connect
- Select the AirPlay icon
- Select Turn Mirroring Off
- Turn off projector by pressing Off button on TekSwamp remote. When shut down prompt appears on screen, press Off once more.
Before connecting to an Apple TV, iPad must be connected to the GreenDoor wireless network.
To ensure the best signal quality in classroom, it is recommended to turn off wifi on iPad and then turn it back on.
- On TekSwamp remote, press On button to turn on projector
- Press HDMI 2 on switcher.
- Activate AirPlay on iPad **
- Slide a finger up from bottom of screen
- Select AirPlay icon (bottom center right – looks like a rectangle with a solid black triangle sticking into bottom)
- Select classroom (all Apple TVs are named by room) and turn Mirroring On
- iPad image should now be projected.
- If image does not appear, go back to AirPlay icon and turn Mirroring On. In some cases, mirroring does not take the first time.
- Volume is controlled via Spkr Up/Down buttons on switcher as well as application playing audio.
- When you are done:
- Disconnect from Apple TV so next person in room can connect
- Go back to Airplay on iPad
- Select iPad to disconnect from Apple TV
- Turn on projector by pressing Projector on Hitachi switcher.
- When done, be sure to disconnect from the Apple TV so the next person in the room can connect.
- Turn off projector by pressing Off button on TekSwamp remote. When shut down prompt appears on screen, press Off once more.
- Disconnect from Apple TV so next person in room can connect
- On TekSwamp remote, press On button to turn on projector
- Press HMDI 3 on switcher.
- Turn on Sony Blu-Ray player by pressing Power on Sony Remote.
- Press Open/Close on remote and insert disc. Press Open/Close to close disc drawer.
- Use Blu-Ray remote for menu functions and viewing options (Play, FF, Rewind).
- Volume is controlled via Spkr Up/Down buttons on switcher.
- When you are done:
- Press Open/Close on remote and remove disc. Press Open/Close to close disc drawer.
- Press Power button on remote
- Turn off projector by pressing Off button on TekSwamp remote. When shut down prompt appears on screen, press Off once more.
Classrooms: B09, 104
- Plug HDMI cable with video adapter on counter top into MacBook
- Press HDMI on button panel. This will turn on Projector, lower screen, and switch input to laptop.
- Use VOL+ and VOL- buttons to raise or lower speaker volume. Volume level may also need to be adjusted in the application.
- When done:
- Unplug HDMI cable from MacBook.
- Press and Hold Off on button panel for 3 seconds. A beep will sound when the projector shuts down and screen will rise
NOTE: When using an HDMI connection for the first time, a change to the audio settings will need to be made on the MacBook. This only needs to done once. While connected to the HDMI cable:
- Click on Apple menu and select System Preferences
- Select Sound
- Select Output tab
- From list displayed under Select a device for sound output:, select NEC (Type will read HDMI)
- Close Sound window
- MacBook will remember this setting
If a VGA connection is required, please contact the ITS Help Desk for assistance.
Wireless projection available through Apple TV in classroom.
If projecting an iPad, please go to Apple TV
If projecting a MacBook, it must be running macOS 10.12.x (Mavericks) or higher.
- MacBook must be connected to GreenDoor
- Press Apple TV on button panel. Projector will turn on, screen will lower, and input will switch to Apple TV. When Apple TV image appears, move on to next steps.
- Click on AirPlay icon in menu bar at top of screen (looks like a rectangle with a solid black triangle sticking into bottom)
- Select Apple TV being used (all Apple TV’s are named by room)
- Desktop image should now be projected.
- Use VOL+ and VOL- buttons to raise or lower speaker volume. Volume level may also be adjusted via the laptop or application.
- When done, be sure to disconnect from Apple TV so next person in room can connect
- Select AirPlay icon
- Select Turn Mirroring Off
- Press and Hold Off on button panel for 3 seconds. A beep will sound when the projector shuts down and screen will rise.
Before connecting to an Apple TV, iPad must be connected to GreenDoor wireless network.
To ensure best signal quality in classroom, it is recommended to turn off wifi on iPad and then turn it back on.
- Lower screen by pressing Down button on screen control panel
- Press Apple TV on button panel. Projector will turn on, screen will lower, and input will switch to Apple TV. When Apple TV image appears on projector, move on to next steps.
- Activate AirPlay on iPad **
- Slide a finger up from bottom of screen
- Select AirPlay icon (bottom center right – looks like a rectangle with a solid black triangle sticking into bottom)
- Select classroom (all Apple TVs are named by room) and turn Mirroring On
- iPad image should now be projected.
- If image does not appear, go back to AirPlay icon and turn Mirroring On. In some cases, mirroring does take at first.
- Volume is controlled via VOL+/VOL- on button panel and the volume toggle on iPad and in app.
When done, be sure to disconnect from Apple TV so next person in the room can connect.
- Go back to AirPlay on iPad
- Select iPad to disconnect from Apple TV
- Press and Hold Off on button panel for 3 seconds. A beep will sound when projector turns off and screen will rise.
** NOTE: To ensure reliable connectivity, you must be running iOS 10.x or later on your iPad. Please contact the ITS Help Desk if you need assistance upgrading to the latest version of iOS.
- Press Power on Sony Blu-Ray player remote to turn on. Remote is in cabinet on top of rack.
- Press BluRay on button panel. This will turn on Projector, lower screen, and switch input to Blu-Ray player.
- Press Open/Close on remote and insert disc. Press Open/Close to close disc drawer.
- Use Blu-Ray remote for menu functions and viewing options (Play, FF, Rewind, Chapter Skip).
- Use VOL+ and VOL- buttons to raise or lower speaker volume.
- When done:
- Eject disc by pressing Open/Close button on remote. Close disc drawer.
- Press Power on remote to turn off Blu-Ray player and replace remote control on top of rack.
- Press and Hold Off on button panel for 3 seconds. A beep will sound when projector turns off and screen will rise.
- Press Document Camera on wall button panel. Projector will turn on, screen will lower, and input will switch to document camera.
- Press Power Button on the Document Camera.
- Place document/object to be displayed under camera
- Document will appear on screen. Camera will Auto-Focus on document/object
- Note: The image may take several seconds to appear.
- Use Controls on the Document Camera for Zoom, Focus and to adjust Brightness
- Use Lamp Switch on Camera Head to toggle between 3 settings Bright, Dim and Off.
- To Freeze image – hold image on screen while changing/replacing current document/object – press and release the Camera Icon
- To continue with another image after Freeze, place new document under camera and press Camera Icon Button.
When Done:
- Press Power button on document camera. Press Power a second time to confirm shut down.
- Press and Hold Offon wall button panel for 3 seconds. Projector will beep to confirm shut down and screen will rise.
Additional Features:
This document camera has the ability to take snapshots and record video of documents/objects under the camera. In addition, the camera can be used to record video of goings on in the classroom (e.g., demonstrations, presentations). If you are interested in using any of these features, please contact Kristopher Wiemer or Heather Sharpes-Smith for assistance.
Ideation Room: B08
Green-screen/Blue-screen basics in iMovie 10.x (2015-16)
Use a green-screen or blue-screen effect
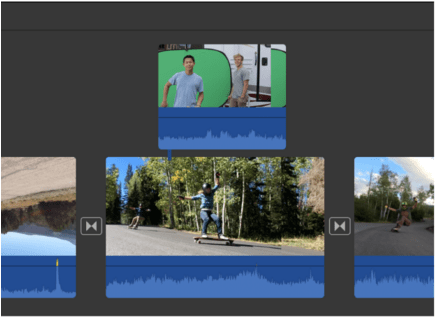
1. In the timeline, select a clip or range that you shot against a green or blue backdrop, and drag it above a clip/photo in your project that you want to use as the background..
When you see the green Add icon (+), release the mouse button.
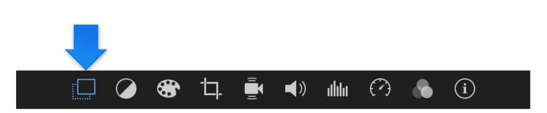
2. If the video overlay controls aren’t shown, click the Video Overlay Settings button.

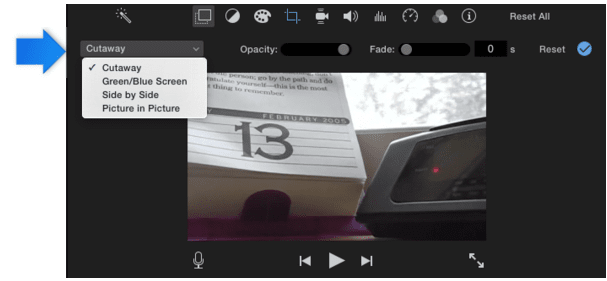
3. Click the pop-up menu on the left that say Cutaway and choose Green/Blue Screen.
In the viewer, the clip shot against the green or blue backdrop has the green or blue removed, and the clip below shows through the areas that were green or blue, creating a composite image.
The color that iMovie removes is based on the dominant color in the frame at the position of the playhead when you choose Green/Blue Screen from the pop-up menu. If the frame below the playhead isn’t representative of the rest of the clip, you may need to reposition the playhead and reapply the effect.
To reposition the green-screen or blue-screen clip, drag it to a different spot within the clip, or to a different clip. You can also drag the ends to lengthen or shorten it.
4. To apply the changes, click the Apply button in the Green/Blue Screen controls.
Adjust a green-screen or blue-screen effect
1. Select the green-screen or blue-screen clip you want to adjust.
2. If the Green/Blue Screen controls aren’t shown, click the Video Overlay Settings button.
3. Do any of the following:
- Adjust the softness of the edges of the superimposed clip: Drag the Softness slider.

- Isolate areas of the green-screen or blue-screen clip: Click the Crop button, and then drag the corners of the frame to isolate the subject in the foreground clip.
- Clean up areas of the green-screen or blue-screen clip: Click the Cleanup button, and then drag across stray parts of the green-screen or blue-screen clip that should not be showing.
- Each time you drag, iMovie uses the new selection to determine what should be cleaned up.
- Tip: You should set Softness before clicking the Clean-up button. If you adjust Softness after you use the Clean-up button, the background cleanup selection is reset and must be reselected.
4. To apply the change, click the Apply button in the Green/Blue Screen controls.
Innovative Classroom: B10
The Innovation Classroom is designed in the TBL (Team-Based Learning) style. The room can be used for in-class presentations utilizing the large flat panel display; or it can be used for team-based exercises and experiences utilizing the 4 pods, each with its own flat panel display, in conjunction with the large flat panel display.
For more information about this space and to discuss how one might use it, please contact ITS Help Desk at (413-774-1444).
In-Class Presentations (Large Flat Panel Display Only)
This room has the ability to display content from a laptop, Apple TV, Blu-Ray player, and document camera. To get started, tap the screen of the touch panel to the right of the Instructor Monitor.
- Tap Instructor Inputs on touch panel
- Tap Wall Monitor on touch panel (flat panel will not turn on until after you select a source)
- Click on source below for further instructions:
- Laptop Projection: wired, wireless
- Blu-Ray, iPad
- Document Camera
Team-Based Learning (All Flat Panel Displays)
Students work at individual pods with the ability to display to the monitor at their pod. The teacher can monitor progress by walking around the room or view individual pod monitors on the Instructor Monitor. The teacher can use the Instructor monitor to prepare materials that can then be displayed to either the Large Flat Panel Display or to all 5 displays in the room. To get started, tap the screen on the touch panel to the right of the Instructor Monitor
- Use the Instructor Monitor
- Use the Large Flat Panel Display to Share Instructor Materials and/or Student Work
- NOTE: When the Wall Monitor is selected, both Wall and Instructor Monitors will display the same content
- Use the Pod Monitors
- NOTE: There is no audio from the pod monitors. If sound is needed, users should use headphones or computer speakers.
- Display to All Monitors
- Tap All Monitors on touch panel
- Tap Instructor Inputs or Student Stations
- Select source from input options (HDMI, VGA, Blu-Ray, Apple TV, Document Camera, Student Monitors 1 -4)
- Selected source will appear on all 5 monitors and Instructor Monitor
- Instructions for individual sources can be found above.
Mobile Flat Panel
- Plug HDMI cable with video adapter on the cart into laptop
- Press Power button on NEC remote to turn on flat panel
- Press SOURCE button on NEC remote
- Select HMDI 1
- Audio is controlled via NEC remote and application
- When done:
- Unplug HDMI cable from the MacBook.
- Press Power on NEC remote
NOTE: When using an HDMI connection for the first time, a change to the audio settings will need to be made on the MacBook. This only needs to done once. While connected to the HDMI cable:
- Click on Apple menu and select System Preferences
- Select Sound
- Select Output tab
- From list displayed under Select a device for sound output:, select NEC (Type will read HDMI)
- Close Sound window
- MacBook will remember this setting
Study Rooms: B04, B06
- Plug HDMI cable with video adapter on tabletop into laptop
- Press Power button on NEC remote to turn on flat panel
- Press SOURCE button on NEC remote
- Select HMDI 1
- Audio is controlled via NEC remote and application
- When done:
- Unplug HDMI cable from the MacBook.
- Press Power on NEC remotes
NOTE: When using an HDMI connection for the first time, a change to the audio settings will need to be made on the MacBook. This only needs to done once. While connected to the HDMI cable:
- Click on Apple menu and select System Preferences
- Select Sound
- Select Output tab
- From list displayed under Select a device for sound output:, select
- E464 (Type will read HDMI) if in Room B04
- V423 (Type will read HDMI) if in Room B06
- Close Sound window
- MacBook will remember this setting
Study Rooms: 108, 207, 208
- Borrow HDMI cable with adapter from Library Front Desk
- Press Power button on Epson remote to turn on projector
- Connect one end of HDMI cable to HDMI port on black box at the base of the white board. Plug other end of HDMI cable into video adapter and video adapter into MacBook.
- If image does not appear on screen, press Source Search on Epson remote. Projector will find HDMI input and display.
- When done:
- Unplug HDMI cable from laptop
- Press Power button on Epson remote. When prompted, press Power button a second time.
- Return HDMI cable with adapter to Library Front Desk
Important Note – When using HDMI for first time, follow these instructions to update MacBook audio settings:
- While connected to projector, click on Apple menu and select System Preferences
- Select Sound
- Select Output tab
- From displayed list, select Epson PJ (Type will read HDMI)
- Close Sound window
- Laptop will remember this setting
Web Conferencing Room: 217
This room has the ability to allow up to four (4) users to connect to the flat panel and take turns displaying their laptop.
- Press Power button on NEC remote to turn on flat panel
- Users can connect MacBooks and most Windows laptops to one of four HDMI cables on table top
- Press white play button on HDMI cable to display device to flat panel (only one device may display at one time)
- When white play button is pressed, the button will light up blue
- If screen does not display,
- check to see if white play button is lit blue; if not, press white play button
- if white play button is lit blue, press Source on NEC remote and select HDMI 1
- Audio is controlled via NEC remote and application
- When done,
- Disconnect cables from devices
- Press Power button on NEC remote to turn off flat panel
NOTE: When using an HDMI connection for the first time, a change to the audio settings will need to be made on the MacBook. This only needs to done once. While connected to the HDMI cable:
- Click on Apple menu and select System Preferences
- Select Sound
- Select Output tab
- From list displayed under Select a device for sound output:, select E464 (Type will read HDMI)
- Close Sound window
- MacBook will remember this setting
The equipment in this room is not a standalone video conferencing system. The equipment provides a higher quality audio and video experience using web conferencing software. We currently support the following web conferencing software packages:
This equipment can be used with other web conferencing software, but we do not currently support these options. The settings indicated for the above products may work with other products, but we cannot make any guarantees and recommend that if you need to use other products, you test them first.
To use web conferencing equipment:
- Borrow web conferencing speakerphone (LifeSize) from Circulation Desk
- Plug network cable with orange tip into network port on bottom of speakerphone (indicated with an orange dot)
- Plug mini-USB cable with blue dot into mini-USB port on bottom of speakerphone (indicated with a blue dot)
- While waiting for speakerphone to power up
- Press Power on NEC remote to turn on flat panel
- Connect one HDMI cable on table top to laptop being used for web conference
- Press white play button on HDMI cable to select laptop as input
- Connect USB cable on table top to laptop being used for web conference
- If no image appears on flat panel, check to see if play button on connected cable is back lit blue
- If play button on connected cable is back-lit blue, press Source on NEC remote
and select HDMI 1
- If play button on connected cable is back-lit blue, press Source on NEC remote
- Open web conferencing application
- Click on a corresponding link above for instructions on configuring and using supported web conferencing software
- Camera control (pan, tilt, zoom) is done through touch pad on LifeSize speakerphone on table.
- Please note that left and right is opposite what you think it would be. Left/right orientation is based on camera view not personal view.
- When sharing documents via web conference, only person connected to web conferencing software can share documents. Others who might be connected to flat panel cannot.
- When done,
- Unplug HDMI, USB, mini-USB, and network cables from laptop and speakerphone
- Press Power on NEC remote to turn off flat panel